Hi all,
In the new Design Manager you have an option to Upload Design Files or
Design packages that can be further edited in the Design Manager.The
option "3. Upload Design Files" in Design manager describes
that the best way to upload these files or packages is by mapping the
Master Page gallery as a Network drive.
Bui if you have tried to map a Network drive and you might run into an error "Windows cannot access ..../_catalogu/masterpage" you need to add feature "Desktop Experience" in Windows Server.
Go to Server Manager, find a "Desktop Experience" feature and isntall it. Server restart is neccessary. After that you can map a network drive successfully.
Have a good day!! :)
Wednesday, July 30, 2014
Tuesday, July 22, 2014
SharePoint 2013 workflow manager configuration on development environment.
Hi all,
if you want to disign and develep workflows for SharePoint 2013 and you already have development environment with installed Windows Server, SharePoint 2013 and SQL, so you will need to install Workflow manager 1.0 and configure it on you virtual local server.
I have virtual SharePoint 2013 environment.
To install workflow manager on you machine use this msdn article:
1. http://technet.microsoft.com/en-us/library/jj193448.aspx
2. After you have successfully installed wfmanager you will get the Service Bus and the Workflow Manager on the local machine.
When the installation is done, the Workflow Manager Configuration Wizard is started automatically.
3. Click “Configure Workflow Manager with Default Settings (Recommended”).
4. Enter SQL Server instance name and test connection
Enter USERID using “DOMAIN\username” instead of email format!
On the development machine we can use HTTP for Workflow Manager, so check this option.
Enter a phrase for the certificate generation key in the fields at the bottom.
Click the right arrow to continue.
5. Check the settings on the summary screen and click the ok button.
6. The installation is started and after a few minutes it will finish successfully
The installation of Workflow Manager 1.0 is done, but we are not finished.
8. Next install the CU1 of the Service Bus and the Workflow Manager. Microsoft provides separate CUs for these products.
Install the CU1 for the Service Bus first.
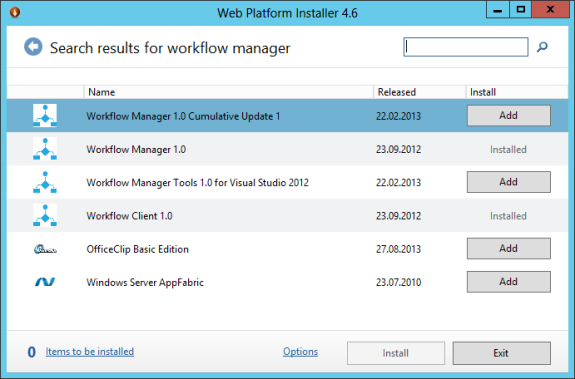
Start the Web Platform Installer
In the Web Platform Installer search for “Service Bus” and click
“Add” in the line with “Service Bus 1.0 Cumulative Update 1″, then click
“Install”.
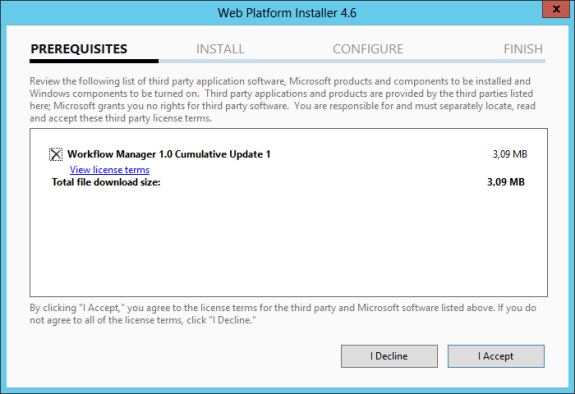
Click “I Accept” and the installation of the Service Bus CU1 is started. When the installation is finished, the machine must be rebooted.
9. When you are logged in again, start the Web Platform Installer and search for “Workflow Manager”.
 Click “Add” in the line with “Workflow Manager Cumulative Update ″ (it can be a newer CU at the moment you make an update) and click “Install”.
 Click “I Accept” to start the installation.
 Click “Finish”.
10. Next install the Microsoft Office Developer Tools for Visual Studio 2012. Again, start the Web Platform Installer and search for “Office”. This installation should finish sucessfully. Click “Finish” to close the dialog.
11. Next we have to connect Workflow Manager to our SharePoint environment. This is done with the cmdlet Register-SPWorkflowService:
That’s it. Workflow Manager is installed in development
environment. To test the functionality create a simple workflow, deploy
the workflow and execute the workflow on an item or a document.
You may run into a problem with the permissions of the Workflow Manager account in one of the databases. In my environment I had to make the account a “dbo” in the “WFInstanceManagementDB” in SQL Server.

Some additional hints for the installation and configuration:
The Workflow Manager account should be local administrator on the machine, where Workflow Manager is installed.
First install the CU1 for Service Bus 1.0 and then install the CU1 for Workflow Manager 1.0.
if you want to disign and develep workflows for SharePoint 2013 and you already have development environment with installed Windows Server, SharePoint 2013 and SQL, so you will need to install Workflow manager 1.0 and configure it on you virtual local server.
I have virtual SharePoint 2013 environment.
To install workflow manager on you machine use this msdn article:
1. http://technet.microsoft.com/en-us/library/jj193448.aspx
2. After you have successfully installed wfmanager you will get the Service Bus and the Workflow Manager on the local machine.
When the installation is done, the Workflow Manager Configuration Wizard is started automatically.
3. Click “Configure Workflow Manager with Default Settings (Recommended”).
4. Enter SQL Server instance name and test connection
Enter USERID using “DOMAIN\username” instead of email format!
On the development machine we can use HTTP for Workflow Manager, so check this option.
Enter a phrase for the certificate generation key in the fields at the bottom.
Click the right arrow to continue.
5. Check the settings on the summary screen and click the ok button.
6. The installation is started and after a few minutes it will finish successfully
7. If you open SQL Managment Studio, you will see a new databases were added.
8. Next install the CU1 of the Service Bus and the Workflow Manager. Microsoft provides separate CUs for these products.
Install the CU1 for the Service Bus first.
Start the Web Platform Installer
9. When you are logged in again, start the Web Platform Installer and search for “Workflow Manager”.


10. Next install the Microsoft Office Developer Tools for Visual Studio 2012. Again, start the Web Platform Installer and search for “Office”. This installation should finish sucessfully. Click “Finish” to close the dialog.
11. Next we have to connect Workflow Manager to our SharePoint environment. This is done with the cmdlet Register-SPWorkflowService:
Register-SPWorkflowService –SPSite "http://host/sitecollection/" –WorkflowHostUri "http://sharepoint" –AllowOAuthHttp
To get
–WorkflowHostUri you need to run PowerShell command (don't forget to arrach Workflow Manager PowerShell library, if you use PowerGui)
$w = Get-WFFarm
That will tell you the name of the endpoint as well as the port you can use (12291 is for HTTP). Find Endpoints field in outpue console log and use it for the
–WorkflowHostUri param
Go to SharePoint Admin > Manage service applications and click on Workflow Service Application Proxy
You shoul see the following message:
You may run into a problem with the permissions of the Workflow Manager account in one of the databases. In my environment I had to make the account a “dbo” in the “WFInstanceManagementDB” in SQL Server.

Some additional hints for the installation and configuration:
The Workflow Manager account should be local administrator on the machine, where Workflow Manager is installed.
First install the CU1 for Service Bus 1.0 and then install the CU1 for Workflow Manager 1.0.
if you will have issue with
Register-SPWorkflowService please
please see this article for help, maybe will help
For more details, I have found a good article. It decribes how to configurate SharePoint 2013 workflows for Production environments.
Have a good day!!! :)
Tuesday, July 8, 2014
How to: Create high-trust apps for SharePoint 2013 (advanced topic)
If you got an message "provider hosted token is null or empty string" trying to deploy SharePoint 2013 provider hosted on on developemnt environment you can read this article above:
Link to MSDN
http://msdn.microsoft.com/en-us/library/office/fp179901.aspx
Link to MSDN
http://msdn.microsoft.com/en-us/library/office/fp179901.aspx
Friday, July 4, 2014
How to expand SharePoint 2013 blog template
How to expand SharePoint 2013 blog template
Standart SharePoint 2013 blog template contains App Web parts called Categories,
Comments, Posts and so on.
But if you want to
show blog authors in a separete web part (the same as Categories looks like) to
let end user to click on the author name to see his posts, you won’t find any
app parts or web part to to that.
First solution might be, you first sugestion in your mind, is to develop own web part. But this approach
could be time consuming, even if this task doesn’t seem so complex. I will show
you how to develop app web par tin other posts. Now we will use SharePoint
Designer 2013 and Links OOTB app.
- Open site you want to add blog authors web par tin SP Designer.
- Find Categories list and Category.aspx page
- Copy Category.aspx under Post list, as it shown in picture below
- Rename just copied page as you wish, inmy case I Renamed it to PostByauthor.apsx
- Open the page and click edit in Advance Mode.
- Replace string CategoryId with AuthorId
- Find and replace string PostCategory with Author.
- Save the PostByauthor.apsx.
- Right Click on PostByauthor.apsx and select “Properties”
- Copy path to the page and open it in browser
- You can get an error that some web part cannot be rendred, just remove broken web part and add a new one. (Blog tools)
- Now go to you blog main page and add Links app to the site
- Find user ID you want to add as an blog author (in my case it was 15)
- Add new item into Link list with url http:/hostweburl /sites/example/alexblog/Lists/Posts/PostsByAuthor.aspx?AuthorId=15
- Add user name in description.
- Add more links to the link list as much as you need, depends on blog author count. Don’t forget to change AuthorId of the end user .
- Place link web part on the page
Somebody can say that it is not convinent way to add blog authors
manualy. Yes, it is, but I can argue if you don’t have a lot of authors in the
blog, for example more then 20, and you know there won’t be more this approach
can work.
Next time I will show you how to create your own blog
authors SharePoint 2013 app
Link to next post
http://sharepointandaspnet.blogspot.com/2014/10/sharepoint-2013-blog-template-custom.html
Link to next post
http://sharepointandaspnet.blogspot.com/2014/10/sharepoint-2013-blog-template-custom.html
See you,
Have a good day! J
SharePoint 2013: Use the SharePoint style sheet in an app
Add this part of code (bold) to your SharePoint 2013 code and then you can use css classes of SharePoint 2013 CSS.
var dclink =
document.createElement("link");
dclink.setAttribute("rel", "stylesheet");
dclink.setAttribute("href", scriptbase + "defaultcss.ashx");
var head = document.getElementsByTagName("head");
head[0].appendChild(dclink);
<script type="text/javascript">
var hostweburl;
// Load
the required SharePoint libraries.
$(document).ready(function () {
// Get
the URI decoded URLs.
hostweburl =
decodeURIComponent(
getQueryStringParameter("SPHostUrl")
);
// The
js files are in a URL in the form:
//
web_url/_layouts/15/resource_file
var scriptbase = hostweburl + "/_layouts/15/";
var dclink =
document.createElement("link");
dclink.setAttribute("rel", "stylesheet");
dclink.setAttribute("href", scriptbase + "defaultcss.ashx");
var head = document.getElementsByTagName("head");
head[0].appendChild(dclink);
// Load
the js files and continue to
// the
execOperation function.
$.getScript(scriptbase + "SP.Runtime.js",
function () {
$.getScript(scriptbase + "SP.js",
execOperation);
}
);
});
</script >
<div class="ms-core-listMenu-verticalBox
ms-noList">
<ul class="static
ms-blog-listMenu-root ms-core-listMenu-root root">
<li>
<span class="ms-core-listMenu-item
ms-blog-quickLinksTitle">Authors</span>
-----------------------------------------------
Subscribe to:
Comments (Atom)


